Twitch isn’t an unfamiliar world to me from a viewer’s position. While it isn’t a daily activity, bi-weekly visits aren’t uncommon. Even with the time I’ve spent on it. I’ve never had to set a stream up – until I joined the Novy Stream Team as a producer. Then I discovered that there are so many micro adjustments that have to be made. Hopefully, what I learned can benefit some of you!
It all starts with the idea that we use the same system to record footage for clients as well. This means different settings for different applications. If you plan on streaming maybe some of these experiences can help guide you to set everything up more quickly.
First, a combination of basically 3 things are needed: a good microphone to prevent picking up too many extra external sounds, headphones/headset to prevent reverb, and a decent internet connection so you can stream at a high enough quality that people can enjoy. If any of these are missing, there’s probably going to be a problem early on making this very difficult.
Learning how everything is connected and functioning is also very important. This allows you to easily assess a problem and adjust settings as needed. Here at Novy, we regularly stream together at multiple locations thousands of miles apart from each other. This means having to really understand how all of these settings work together.
Next up is getting the right hardware + software to capture everything. At the core of it all is Windows running the software. In order to combine everything into one stream, we’re using OBS. The inputs include Elgato to capture footage and audio from mobile devices, PS4 Remote Play to capture the PS4, Steam to run PC applications, a desk mic and camera for our main face Marcos, and Skype to gather all of the voices including an occasional developer.
When you web everything together you get something that looks like this:
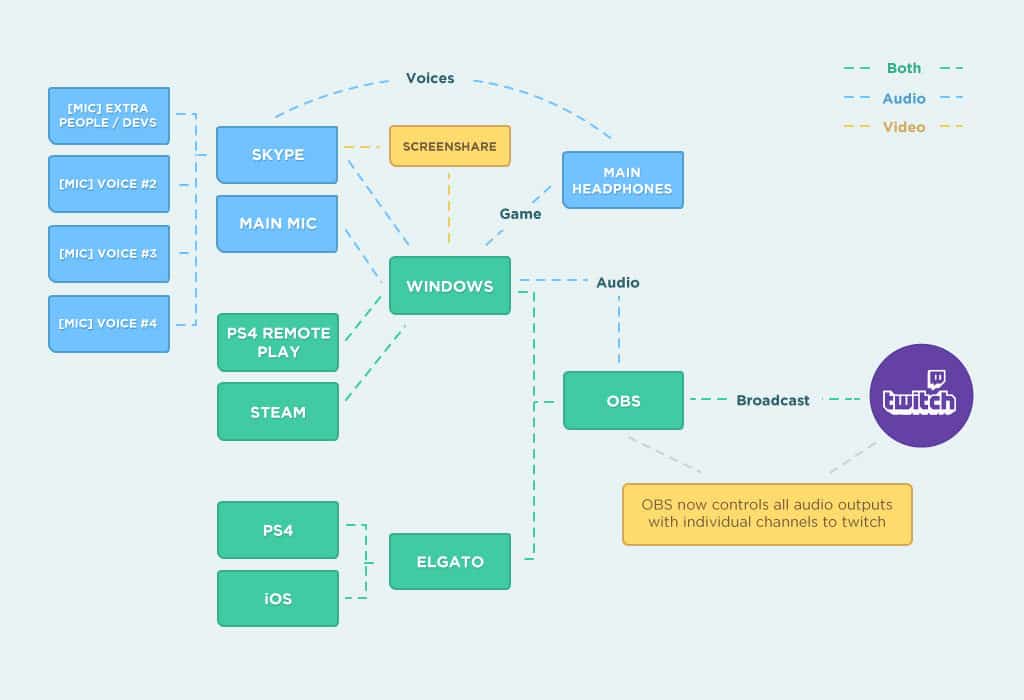
(Diagram created by Aaron Goldman; polished by Adam Godoi)
Anything in red is an adjustment that can be made to change how the final output to Twitch will turn out. Knowing these are absolutely key to adjust everyone and everything individually. Is someone’s voice too high? You’ll probably have to isolate that mic and adjust them separately. Is the game from your game too high? That’s adjusted via the Windows settings.

Once you understand where everything can be adjusted, it’s a game of balance. You want everyone to sound at the same volume, screens to be adjusted to the right ratios, and at the same time have it all run smoothly for the viewers to enjoy.
Update:
It’s been a few weeks now, and every stream is a learning experience. We’ve even added a second team! This means more equipment from a new remote location. Everything from before still applies in order to have everything balance properly.
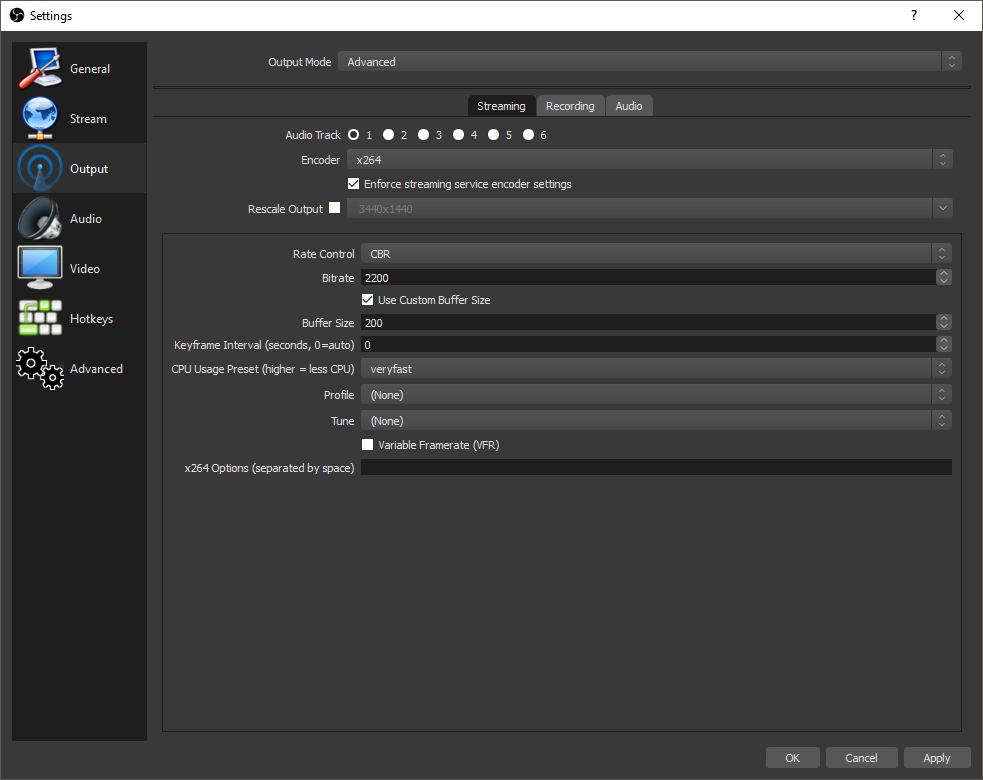
I’ve found that in order to have everything function properly, we’ve had to change from default settings. Both of our setups use OBS in order to stream to Twitch. However, it’s never as easy as just pressing go.
In order to have both streams running smoothly, we’ve had to change stream quality and how much each machine is processing for quality. I’ve noticed the best method is to find a good resolution, begin broadcasting, and seeing just how much of a constant bitrate (CBR) can be achieved. For more powerful machines, it may be better to use a variable bitrate (VBR) and set limits instead to achieve better quality. VBR takes longer to encode but produces better results.
Like before, finding a balance where everything works properly is key. Since we are using Skype to stream a live feed, this means managing the proverbial internet highway of bandwidth is very important!